


6 Steps to Armstrong Ceiling Planks Installation for Commercial Spaces
Dalam bangunan komersial, siling berfungsi bukan sahaja meliputi elemen struktur yang lebih tinggi. Ia memberikan penampilan yang digilap, profesional, akustik yang lebih baik dan meningkatkan reka bentuk. Kerana rupa moden, ketahanan dan kesederhanaan, papan siling Armstrong adalah antara yang paling kerap digunakan untuk siling komersial. Namun, kemasan yang sempurna bergantung pada pemasangan yang baik. Mengetahui proses terperinci adalah penting jika anda berfikir tentang memasang papan siling Armstrong dalam persekitaran komersial anda.
Panduan ini akan memandu anda melalui tujuh langkah menyeluruh untuk Papan siling Armstrong pemasangan , jadi memastikan anda menghasilkan keputusan profesional dengan nilai seumur hidup. Setiap peringkat, daripada perancangan hingga butiran terakhir, adalah penting, dan artikel ini menyusunnya dengan cara yang boleh difahami.
Langkah 1: Perancangan dan Persediaan
Setiap pemasangan yang baik bermula dengan penyediaan yang rapi. Pemasangan papan siling Armstrong memerlukan kesedaran menyeluruh tentang ukuran, susun atur dan keperluan ruang. Ukur ruang papan siling akan dipasang terlebih dahulu. Pengukuran yang tepat adalah sangat penting kerana kesilapan pengiraan yang sedikit boleh menyebabkan masalah penjajaran.
Anda juga perlu menilai sistem siling semasa dalam peringkat ini. Cari sebarang kecacatan atau kerosakan yang mungkin perlu diperbaiki sebelum pemasangan. Saluran HVAC, wayar atau sistem pemercik yang terdapat dalam bangunan komersial kadangkala perlu dipertimbangkan semasa peringkat perancangan. Perhatikan mana-mana tempat di mana papan mungkin perlu dipotong agar sesuai dengan cabaran ini.
Satu lagi komponen penting untuk bersiap sedia ialah menyusun alatan dan bekalan yang diperlukan. Antara alat piawai ialah pita pengukur, aras, alat pemotong logam, dan gerudi. Semak juga bahawa anda mempunyai semua bahagian yang diperlukan, termasuk papan siling Armstrong, sistem penggantungan dan sebarang perkakasan yang disertakan. Perancangan yang baik menyediakan tanah untuk pemasangan yang mudah.
S tep 2: Memasang Sistem Penggantungan
Pemasangan papan siling Armstrong berkisar pada sistem penggantungan. Ia memberikan sokongan struktur papan yang diperlukan untuk dipasang dengan kukuh. Mulakan dengan mencatat di mana pada dinding sistem penggantungan harus dipasang. Untuk menjamin bahawa markah adalah sekata, gunakan tahap; peletakan yang tidak rata boleh menjejaskan produk akhir.
Pasang pelari sistem penggantungan utama sebaik sahaja tanda telah ditetapkan. Untuk menjamin kestabilan, ini hendaklah dilekatkan dengan kukuh pada rangka kerja dinding atau siling semasa. Kemudian tee silang ditambah untuk mencipta corak grid yang akan menyokong papan individu. Dalam persekitaran komersial, sistem ampaian perlu cukup kuat untuk menguruskan berat papan dan sebarang komponen tambahan, termasuk bahan penebat akustik.
Video di bawah menunjukkan langkah pemasangan sistem penggantungan siling Armstrong, membantu anda lebih memahami proses penting ini secara visual
Pada peringkat ini, penjajaran yang betul adalah sangat penting. Sahkan sama ada sistem penggantungan betul-betul lurus menggunakan aras laser. Sebarang penjajaran di sini akan mempengaruhi rupa dan prestasi umum siling.
Langkah 3: Memotong dan Menyediakan Papan

Walaupun papan siling Armstrong dibuat agar sesuai dengan sempurna, kebanyakan persekitaran komersil memerlukan beberapa penyesuaian agar sesuai dengan reka letak yang luar biasa. Ukur setiap bahagian sistem ampaian untuk memastikan di mana pemotongan diperlukan sebelum meletakkan papan.
Memotong papan mengikut saiz yang diperlukan memerlukan penjagaan yang teliti dengan alat pemotong logam. Membuat potongan tepat membantu mengelakkan tepi atau jurang yang tidak sama semasa pemasangan. Ukur dan tandakan papan di kawasan yang mempunyai halangan, bolong atau lekapan lampu seperti itu, untuk membuat potongan yang membolehkan elemen ini sesuai dengan sempurna.
Memeriksa tepi untuk sebarang kekasaran atau burr setelah papan telah dipotong adalah Meratakan kelemahan ini untuk menjamin kesesuaian yang kemas. Penyediaan awal papan membantu mengurangkan kesilapan dan mempercepatkan proses pemasangan.
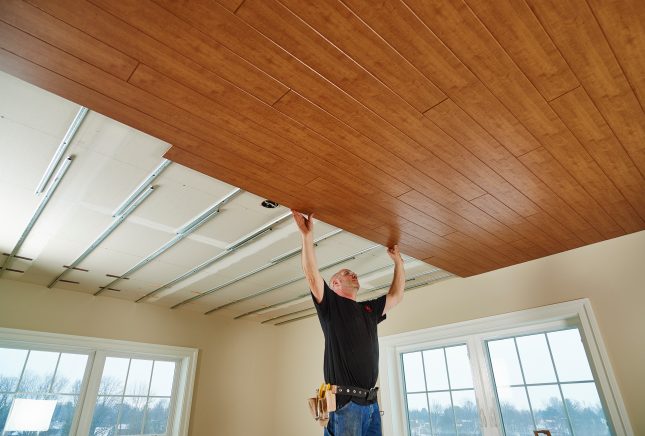
Langkah 4: Memasang Papan
Masa untuk memulakan pemasangan datang apabila sistem penggantungan disediakan dan papan sudah siap. Pasang satu papan pada satu masa dengan cara anda melintasi satu hujung ruang. Naikkan setiap papan perlahan-lahan supaya ia selaras dengan grid sistem ampaian.
Pastikan setiap papan terletak betul-betul di dalam grid untuk kesesuaian yang ketat. Jika papan mempunyai lidah dan alur, sambungkan dengan teliti untuk menghasilkan rupa yang licin. Semasa anda bekerja, beri perhatian yang tinggi kepada penjajaran kerana sedikit kesilapan letak boleh menjejaskan penampilan umum siling.
Peringkat ini juga memerlukan mencari sebarang kemungkinan jurang antara papan. Sekiranya jurang wujud, tukar lokasi untuk menutupnya. Penampilan dan operasi siling bergantung secara kritikal pada ketat, sekata.
Langkah 5: Penamat Sentuhan dan Pemeriksaan
Menambah sebarang sentuhan kemasan menjamin penampilan yang digilap sebaik sahaja semua papan diletakkan. Untuk menyembunyikan sebarang jurang antara papan dan dinding, ini boleh termasuk meletakkan trim atau acuan di sekeliling tepi siling. Selain daripada menambah baik rupa siling, trim menambah lebih kestabilan.
Lihat seluruh siling untuk sebarang kecacatan atau tempat yang mungkin memerlukan pembetulan. Cari permukaan ganjil, jurang atau masalah penjajaran. Sekiranya timbul sebarang masalah, uruskan dengan cepat untuk mencapai penamat yang sempurna. Fasa ini juga membolehkan seseorang menyemak kestabilan sistem penggantungan dan menjamin bahawa setiap komponen berada pada tempatnya.
Semakan menyeluruh memastikan siling memenuhi kriteria fungsional serta estetik, jadi sediakan ia untuk digunakan dalam sektor perniagaan.
Langkah 6: Penyelenggaraan Petua untuk Awet Muda
Memastikan jangka hayat papan siling Armstrong bergantung pada penyelenggaraan yang betul. Buat jadual pembersihan dan penyelenggaraan yang kerap untuk mengekalkan siling dalam bentuk terbaik selepas pemasangan. Oleh kerana papan logam adalah tahan kakisan dan noda, ia memerlukan sedikit penyelenggaraan.
Cari sebarang kerosakan atau haus pada siling, termasuk kawasan yang berubah warna atau papan longgar, secara berkala. Ambil perhatian segera masalah ini untuk menghentikan peningkatannya. Dari masa ke masa, membersihkan papan dengan kain lembap atau agen pembersih lembut akan membantu mereka kekal cantik dari segi estetika dan berfungsi dengan baik.
Dalam persekitaran komersial, siling biasanya memberikan kesukaran khusus termasuk pendedahan kepada asap kimia, habuk atau lembapan. Mengekalkan pengudaraan yang sesuai dan mengendalikan elemen persekitaran akan membantu siling untuk bertahan lebih lama.
Kesimpulan
Pemasangan papan siling Armstrong adalah proses berkaedah yang memerlukan perancangan yang teliti, ketepatan dan perhatian terhadap perincian. Mengikuti tujuh langkah ini akan membantu syarikat mencapai siling kualiti profesional yang meningkatkan akustik, penampilan dan penggunaan persekitaran komersial mereka. Daripada menetapkan sistem penggantungan kepada menambahkan sentuhan penamat, setiap peringkat adalah sangat penting untuk menghasilkan hasil yang sempurna.
Untuk penyelesaian siling berkualiti premium, percayalah PRANCE Metalwork Building Material Co. Ltd . Hubungi kami hari ini untuk mengetahui cara produk kami boleh meningkatkan ruang komersial anda dengan prestasi dan reka bentuk yang luar biasa.